Ansible module for PowerMax
In the previous article I explained that the configuration management ecosystem and the automation in general is too crowded and dynamic and it is easy to make the wrong decision that can be costly in the long term. In my opinion, one tool is emerging as the winner above the rest, and that tool is Ansible. It is no surprise that more and more modules are being released to manage other aspects of the IT infrastructure including on-prem hardware.
One example of that is PowerMax/VMAX which got its first release in June 2019. This first version covers all the basics of storage provisioning including snapshots
https://github.com/dell/ansible-powermax
It leverages the popular PyU4V python library which wraps the REST API that lives in Unisphere. The library provides way more functionality than that, so it wouldn’t surprise anyone to see more versions in the near future that provide more functionality. The “Product Guide” document in the “docs” folder of the DellEMC repo provides instructions on how to install the Ansible modules including the PyU4V library
I recently published a GitHub repository that contains sample playbooks to illustrate how to use the Ansible module for PowerMax and VMAX
https://github.com/cermegno/ansible-powermax-example
The repo is structured as a series of steps to gradually go from a first contact to implementing best practices. I have found that this didactical approach works well in customer demos as most customers are not used to the “declarative” paradigm.
The first example in “step 1” in the repo shows the code to create a Storage Group. A state of ‘present’ will create the Storage Group if it doesn’t exist. The opposite behavior is to use state ‘absent’ which will get rid of it if it exists or do nothing if it doesn’t
An important observation is that the ‘hosts’ is set to localhost. Ansible typically uses SSH to manage hosts. In that case one needs to specify the hosts to be managed in the ‘/etc/ansible/hosts’ file. Since the PowerMax module uses the REST API instead of SSH, the ‘hosts’ file is ignored. Instead we need to pass all the information required for the API call with every Ansible play. This includes, as you would expect credentials. But also, the serial number of the array along with the IP of Unisphere, because ultimately a single Unisphere typically manage more than one array
Another piece of information you will see in the playbook is the version of the API you want to hit as Unisphere provides multiple versions of the API for backwards compatibility.
Step 2 shows a playbook with 2 inter-related tasks such as creating a Storage Group and then creating a Volume in the SG. After seeing that playbook, one starts to wonder if there is a way to:
Firstly, you can use Ansible variables to make the playbook more reusable. Variables are surrounded by double curly brackets, ex: {{ password }}. You can define variables in multiple way. Some examples include: read from environment variables, pass variables during the invocation of Ansible, read from external files, generated dynamically from other task’s output … Having so many choices to read them can sometimes be complicated as the same variable defined in multiple places will overwrite each other. You can look up the order of precedence and other important information about Ansible variables in this page
Secondly, if all our tasks are aimed at the same array we can define an “alias” with the “input” syntax below


We could encrypt it by doing: “ansible-vault encrypt creds.yml”. Ansible will ask us for a password to be able to complete the encryption of the file
Then during invocation time, we need to use the “--ask-vault-pass” flag as follows
ansible-playbook provision.yml --ask-vault-pass
Then Ansible will ask as for the encryption password before continuing with the playbook
If we no longer need the file to be encrypted, or we simply need to change the password written inside we can decrypt it like this:
ansible-vault decrypt creds.yml
Steps 4 and 5 are a sample end-to-end provisioning and a snapshots example respectively that I have largely inspired by the work of my colleague Paul Martin. Paul specializes in VMAX/PowerMax and maintains a highly informative blog about that product which I highly recommend to all VMAX customers
One example of that is PowerMax/VMAX which got its first release in June 2019. This first version covers all the basics of storage provisioning including snapshots
https://github.com/dell/ansible-powermax
It leverages the popular PyU4V python library which wraps the REST API that lives in Unisphere. The library provides way more functionality than that, so it wouldn’t surprise anyone to see more versions in the near future that provide more functionality. The “Product Guide” document in the “docs” folder of the DellEMC repo provides instructions on how to install the Ansible modules including the PyU4V library
I recently published a GitHub repository that contains sample playbooks to illustrate how to use the Ansible module for PowerMax and VMAX
https://github.com/cermegno/ansible-powermax-example
The repo is structured as a series of steps to gradually go from a first contact to implementing best practices. I have found that this didactical approach works well in customer demos as most customers are not used to the “declarative” paradigm.
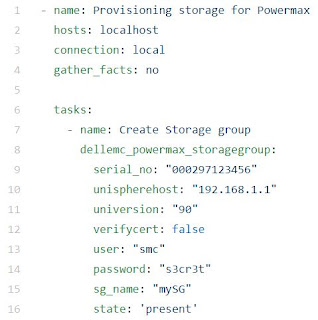
The first example in “step 1” in the repo shows the code to create a Storage Group. A state of ‘present’ will create the Storage Group if it doesn’t exist. The opposite behavior is to use state ‘absent’ which will get rid of it if it exists or do nothing if it doesn’t

An important observation is that the ‘hosts’ is set to localhost. Ansible typically uses SSH to manage hosts. In that case one needs to specify the hosts to be managed in the ‘/etc/ansible/hosts’ file. Since the PowerMax module uses the REST API instead of SSH, the ‘hosts’ file is ignored. Instead we need to pass all the information required for the API call with every Ansible play. This includes, as you would expect credentials. But also, the serial number of the array along with the IP of Unisphere, because ultimately a single Unisphere typically manage more than one array
Another piece of information you will see in the playbook is the version of the API you want to hit as Unisphere provides multiple versions of the API for backwards compatibility.
Step 2 shows a playbook with 2 inter-related tasks such as creating a Storage Group and then creating a Volume in the SG. After seeing that playbook, one starts to wonder if there is a way to:
- make the playbook more reusable so that it can be used for multiple provisioning activities and not just one
- avoid repeating the same information when we are doing multiple tasks against the same array
- avoid explicitly showing the credentials to the array
Firstly, you can use Ansible variables to make the playbook more reusable. Variables are surrounded by double curly brackets, ex: {{ password }}. You can define variables in multiple way. Some examples include: read from environment variables, pass variables during the invocation of Ansible, read from external files, generated dynamically from other task’s output … Having so many choices to read them can sometimes be complicated as the same variable defined in multiple places will overwrite each other. You can look up the order of precedence and other important information about Ansible variables in this page
Secondly, if all our tasks are aimed at the same array we can define an “alias” with the “input” syntax below
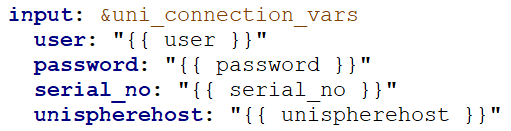
Subsequently you can bring the alias into your task like this
Finally, we have the challenge of not explicitly exposing sensitive information such as credentials. For that purpose, Ansible comes bundled with the “ansible-vault” tool. In this instance you can have another YAML file called “creds.yml” containing something like:

We could encrypt it by doing: “ansible-vault encrypt creds.yml”. Ansible will ask us for a password to be able to complete the encryption of the file
Then during invocation time, we need to use the “--ask-vault-pass” flag as follows
ansible-playbook provision.yml --ask-vault-pass
Then Ansible will ask as for the encryption password before continuing with the playbook
If we no longer need the file to be encrypted, or we simply need to change the password written inside we can decrypt it like this:
ansible-vault decrypt creds.yml
Steps 4 and 5 are a sample end-to-end provisioning and a snapshots example respectively that I have largely inspired by the work of my colleague Paul Martin. Paul specializes in VMAX/PowerMax and maintains a highly informative blog about that product which I highly recommend to all VMAX customers


Comments
Post a Comment