Use Vagrant to deploy to AWS
In the Pied Piper program we run through a Vagrant tutorial as we found it a great tool to help set up other labs. We are not going to cover Vagrant in detail in this blog as there are plenty of good examples out there. If you are interested in the exercises we did you can visit the repository:
https://github.com/cermegno/vagrant-lesson
However, something I felt is not sufficiently document and would make a good candidate for a post is how to use Vagrant to deploy to AWS and particularly from Windows. I found a couple of posts that provided good detail but none of them prevented me from running into Windows specific issues. If you are running it from Linux, this article will still help you as I will point out the differences anyway.
Deploying to AWS EC2 generally means selecting an AMI (Amazon Machine Image) instead of dealing with a full image as you would do with "Atlas". However Vagrant still needs to use a box. The solution is to install the dummy box provided by Hashicorp:


NOTE: AWS recommends creating and IAM user that has the keys rather than relying on root access keys


https://github.com/cermegno/vagrant-lesson
Open the "Vagrantfile" file with your favourite text editor and populate the information you have collected
IMPORTANT: Vagrant by default likes to map the current directory as a "synced" folder with the target, however in the absence of "Rsync" or similar in your Windows system the safest setting is to "disabled : true". My advice is to run it first with synching disabled and then experiment with "Rsync" or similar once everything else works.
NOTE: If you need to place some files into your instance don't despair, as long as the files are sitting somewhere on the Internet you can use the another method like "wget" as shown in the "provision" section.
NOTE: If you are deploying from Linux my advice is also to initially disable the "synced folder" and to experiment with once everything else works.
To ssh from Linux or an SSH client that supports ".pem" you can issue the command:
Note the "ec2-user" before the "@". You will need to specify the username specific to the OS in your AMI. Finally you can get the dns of you machine from the EC2 Dashboard and it will look something like:
https://github.com/cermegno/vagrant-lesson
Install prerequisites
Firstly, as the Vagrant documentation states, "providers" other than VirtualBox require a plug in. This is how you install the AWS provider:vagrant plugin install vagrant-aws
Deploying to AWS EC2 generally means selecting an AMI (Amazon Machine Image) instead of dealing with a full image as you would do with "Atlas". However Vagrant still needs to use a box. The solution is to install the dummy box provided by Hashicorp:
vagrant box add dummy https://github.com/mitchellh/vagrant-aws/raw/master/dummy.box
Gathering information
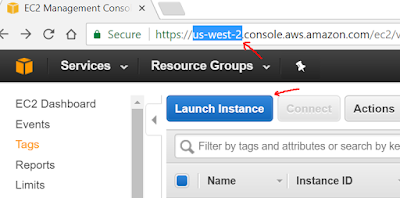
With the previous to prerequisites out of the way the next step is to collect all the details we need to populate the "Vagrantfile". The list is quite extensive but I will show you screenshots of where to find all the information.- AWS Region. Firstly you will need to make note of your region of choice, ex: us-west-2. You will see this in the url of your browser.

- Choose the AMI (Amazon Machine Image) you want to use. You can see the available options by clicking the "Launch Instance" button while at the EC2 Dashboard. Each AMI has a certain OS, ex: Amazon Linux (a derivative of CentOS), SUSE, Debian, etc and a number of software packages pre-installed to meet your needs. For the AWS Vagrant install you are going to keep a record of the AMI-id. In my screenshot I will keep "ami-aa5ebdd2". Please note that the id is likely to change if you want to use a different region. Make sure you remember also the OS you chose because this will determine the default user to use with SSH

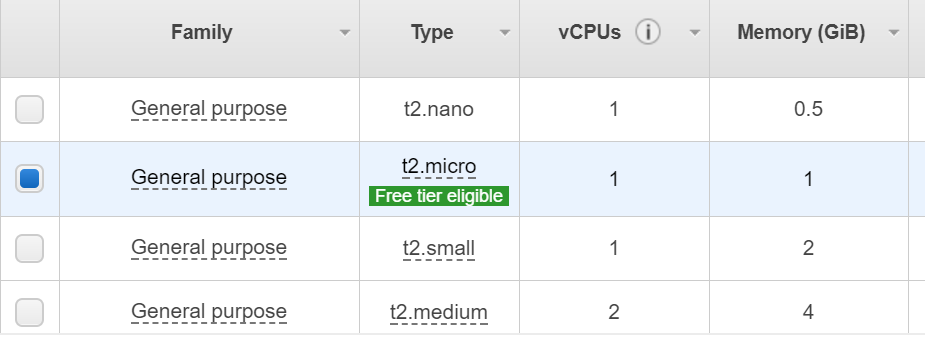
- Instance type. This is essentially the size of the AMI in terms of RAM, disk, etc. From the screenshot below I have chosend "t2.micro"
- Access and secret keys. If you already had an AWS account prior to reading this article, chances are you know already these. As of this writing it is no longer possible to view the secret key once it has been generated. If you don't remember it you might to generate keys again. You can view or generate your keys in:
top-right dropdown menu --> my security credentials --> Access Keys
NOTE: AWS recommends creating and IAM user that has the keys rather than relying on root access keys
- EC2 keys (.pem file). Go to EC2 Dashboard, click on "Key Pairs" and follow the prompts to create a ".pem" file. Once created it will get downloaded automatically to your computer.


- Default SSH user. Make note of the default SSH user for your AMI as described in the following table:
| Operating System | SSH user |
|---|---|
| Amazon Linux | ec2-user |
| Ubuntu | ubuntu |
| Debian | admin |
| RHEL 6.4 and later | ec2-user |
| RHEL 6.3 and earlier | root |
| Fedora | fedora |
| Centos | centos |
| SUSE | root |
- Security Group. A Security Group defines what combination of IP addresses and ports will be allowed inbound and outbound. At a minimum you are going to need to SSH access from your Windows system from where you are running Vagrant Window. Initially however, the easiest is set an "Inbound rule" with "My IP" as a source (it will autodetect it) and and "Outbound rule" with the default "Port Range = 0 - 65535" and "Destination 0.0.0.0/0". In my case the anem of the Security Group I have chosen is "default"
Preparing the Vagrantfile
If you haven't done so, go the github repository and download the contents. You will need the "aws" folder.https://github.com/cermegno/vagrant-lesson
Open the "Vagrantfile" file with your favourite text editor and populate the information you have collected
# -*- mode: ruby -*-
# vi: set ft=ruby :

Vagrant.configure(2) do |config|
 config.vm.box = "dummy"
 config.vm.provider :aws do |aws, override|
   aws.access_key_id = "123-your_access_key-ABC"
   aws.secret_access_key = "12345-your-AWS-secret-key-goes-here-ABCDE"
   aws.keypair_name = "myKeyPair"
   aws.ami = "ami-aa5ebdd2"
   aws.region = "us-west-2"
   aws.instance_type = "t2.micro"
   aws.security_groups = ['default']

   config.vm.synced_folder '.', '/vagrant', disabled: true

#   override.vm.box = "dummy"
   override.ssh.username = "ec2-user"
   override.ssh.private_key_path = "C:\\Full\\path\\to\\your\\EC2\\myKeyPair.pem"
 end

   config.vm.provision "shell", inline: <<-SHELL
        sudo yum -y install python-pip
        sudo pip install flask
 sudo pip install redis
        wget https://raw.githubusercontent.com/cermegno/Ansible-test/master/web.py
  SHELL

end
IMPORTANT: Vagrant by default likes to map the current directory as a "synced" folder with the target, however in the absence of "Rsync" or similar in your Windows system the safest setting is to "disabled : true". My advice is to run it first with synching disabled and then experiment with "Rsync" or similar once everything else works.
NOTE: If you need to place some files into your instance don't despair, as long as the files are sitting somewhere on the Internet you can use the another method like "wget" as shown in the "provision" section.
NOTE: If you are deploying from Linux my advice is also to initially disable the "synced folder" and to experiment with once everything else works.
Moment of truth
After following all the steps above there is only one step left. Open a command prompt or terminal, go to the directory that contains the "Vagrantfile" and typevagrant up
Logging in
Logging in Windows is going to depend on your SSH client and whether it supports ".pem" certificates or not. A common example is PUTTY which doesn't support it. This AWS article explains how to convert the ".pem" file so that you can use PUTTYTo ssh from Linux or an SSH client that supports ".pem" you can issue the command:
ssh -i "/root/aws-vagrant/Vagrant.pem" ec2-user@dns-of-your-machine.com
Note the "ec2-user" before the "@". You will need to specify the username specific to the OS in your AMI. Finally you can get the dns of you machine from the EC2 Dashboard and it will look something like:
ec2-35-163-63-170.us-west-2.compute.amazonaws.com

Simple and complete, thanks for this guide!
ReplyDeleteThis comment has been removed by the author.
ReplyDeleteThis comment has been removed by the author.
ReplyDeleteHi ANZ Pied piper,I am getting below error. Can you please suggest how to resolve it.
ReplyDeleteError: The machine with the name '—-provider=aws' was not found configured for this Vagrant
environment.
My vagrant file is as follows
Vagrant.configure("2") do |config|
config.vm.box = "dummy"
config.vm.provider :aws do |aws, override|
aws.access_key_id = "AKIAI2VYCOMMXVJ764fr4"
aws.secret_access_key = "8OfGR3q3aIAiZILXX6fy6PgChaoOOOynzKHHbGrfd"
aws.keypair_name = "guruomnewkey"
aws.ami = "ami-6871a115"
override.ssh.username = "ec2-user"
override.ssh.private_key_path = "C:\\Users\\ACER\\Downloads\\guruomnewkey.pem"
end
end
config.vm.provider :aws do |aws, override| do
Deletecorrect it
Hi Pied Piper I stuck here can you please help how to resolve this isue
ReplyDeleteD:\project>vagrant up --provider=aws
Bringing machine 'default' up with 'aws' provider...
==> default: Warning! The AWS provider doesn't support any of the Vagrant
==> default: high-level network configurations (`config.vm.network`). They
==> default: will be silently ignored.
==> default: Launching an instance with the following settings...
==> default: -- Type: t2.micro
==> default: -- AMI: ami-922914f7
==> default: -- Region: us-east-2
==> default: -- Keypair: guruom
==> default: -- Security Groups: ["default"]
==> default: -- Block Device Mapping: []
==> default: -- Terminate On Shutdown: false
==> default: -- Monitoring: false
==> default: -- EBS optimized: false
==> default: -- Source Destination check:
==> default: -- Assigning a public IP address in a VPC: false
==> default: -- VPC tenancy specification: default
==> default: Warning! Vagrant might not be able to SSH into the instance.
==> default: Please check your security groups settings.
==> default: Waiting for instance to become "ready"...
==> default: Waiting for SSH to become available...D:\project>vagrant up --provider=aws
Bringing machine 'default' up with 'aws' provider...
==> default: Warning! The AWS provider doesn't support any of the Vagrant
==> default: high-level network configurations (`config.vm.network`). They
==> default: will be silently ignored.
==> default: Launching an instance with the following settings...
==> default: -- Type: t2.micro
==> default: -- AMI: ami-922914f7
==> default: -- Region: us-east-2
==> default: -- Keypair: guruom
==> default: -- Security Groups: ["default"]
==> default: -- Block Device Mapping: []
==> default: -- Terminate On Shutdown: false
==> default: -- Monitoring: false
==> default: -- EBS optimized: false
==> default: -- Source Destination check:
==> default: -- Assigning a public IP address in a VPC: false
==> default: -- VPC tenancy specification: default
==> default: Warning! Vagrant might not be able to SSH into the instance.
==> default: Please check your security groups settings.
==> default: Waiting for instance to become "ready"...
==> default: Waiting for SSH to become available...
The security group should have port 22 open to the world for the new instances which got created
DeleteReally nice blog post.provided a helpful information.I hope that you will post more updates like this
ReplyDeleteAWS Online Course
Hi,
ReplyDeleteThanks for providing such a good information. I have a query, what if I do not want to provide access key and secret access key directly into Vagrantfile (as this is not safe)? Can I set variables or anything else? If yes, can you please provide me the details?
Very nice article,Keep sharing it.
ReplyDeleteThank you...
ServiceNow Developer Training
sccm training
ReplyDeletemysql training
abinitio training
spark training
scala training
azure devops training
Thank For sharing Valuable Information
ReplyDeleteAWS Online Training Hyderabad
Best AWS Online Course
Thank you for sharing wonderful information with us to get some idea about that content.
ReplyDeleteServiceNow now Learning
ServiceNow Online Training
vagrant.exe up --provider=aws
ReplyDeleteVagrant.require_plugin is deprecated and has no effect any longer.
Use `vagrant plugin` commands to manage plugins. This warning will
be removed in the next version of Vagrant.
Traceback (most recent call last):
25: from C:/HashiCorp/Vagrant/embedded/gems/2.2.19/gems/vagrant-2.2.19/bin/vagrant:231:in `'
24: from C:/HashiCorp/Vagrant/embedded/gems/2.2.19/gems/vagrant-2.2.19/lib/vagrant/environment.rb:290:in `cli'
23: from C:/HashiCorp/Vagrant/embedded/gems/2.2.19/gems/vagrant-2.2.19/lib/vagrant/cli.rb:67:in `execute'
22: from C:/HashiCorp/Vagrant/embedded/gems/2.2.19/gems/vagrant-2.2.19/plugins/commands/up/command.rb:87:in `execute'
21: from C:/HashiCorp/Vagrant/embedded/gems/2.2.19/gems/vagrant-2.2.19/lib/vagrant/plugin/v2/command.rb:186:in `with_target_vms'
20: from C:/HashiCorp/Vagrant/embedded/gems/2.2.19/gems/vagrant-2.2.19/lib/vagrant/plugin/v2/command.rb:186:in `each'
19: from C:/HashiCorp/Vagrant/embedded/gems/2.2.19/gems/vagrant-2.2.19/lib/vagrant/plugin/v2/command.rb:204:in `block in with_target_vms'
18: from C:/HashiCorp/Vagrant/embedded/gems/2.2.19/gems/vagrant-2.2.19/lib/vagrant/plugin/v2/command.rb:180:in `block in with_target_vms'
17: from C:/HashiCorp/Vagrant/embedded/gems/2.2.19/gems/vagrant-2.2.19/lib/vagrant/environment.rb:716:in `machine'
16: from C:/HashiCorp/Vagrant/embedded/gems/2.2.19/gems/vagrant-2.2.19/lib/vagrant/vagrantfile.rb:81:in `machine'
15: from C:/HashiCorp/Vagrant/embedded/gems/2.2.19/gems/vagrant-2.2.19/lib/vagrant/vagrantfile.rb:81:in `new'
14: from C:/HashiCorp/Vagrant/embedded/gems/2.2.19/gems/vagrant-2.2.19/lib/vagrant/machine.rb:154:in `initialize'
13: from C:/HashiCorp/Vagrant/embedded/gems/2.2.19/gems/vagrant-2.2.19/lib/vagrant/machine.rb:541:in `state'
12: from C:/Users/minhthanh/.vagrant.d/gems/2.7.4/gems/vagrant-aws-0.7.2/lib/vagrant-aws/provider.rb:32:in `state'
11: from C:/HashiCorp/Vagrant/embedded/gems/2.2.19/gems/vagrant-2.2.19/lib/vagrant/machine.rb:201:in `action'
10: from C:/HashiCorp/Vagrant/embedded/gems/2.2.19/gems/vagrant-2.2.19/lib/vagrant/machine.rb:197:in `block in action'
9: from C:/HashiCorp/Vagrant/embedded/gems/2.2.19/gems/vagrant-2.2.19/lib/vagrant/machine.rb:215:in `block in action'
8: from C:/HashiCorp/Vagrant/embedded/gems/2.2.19/gems/vagrant-2.2.19/lib/vagrant/machine.rb:246:in `action_raw'
7: from C:/HashiCorp/Vagrant/embedded/gems/2.2.19/gems/vagrant-2.2.19/lib/vagrant/action/runner.rb:89:in `run'
6: from C:/HashiCorp/Vagrant/embedded/gems/2.2.19/gems/vagrant-2.2.19/lib/vagrant/util/busy.rb:19:in `busy'
5: from C:/HashiCorp/Vagrant/embedded/gems/2.2.19/gems/vagrant-2.2.19/lib/vagrant/action/runner.rb:89:in `block in run'
4: from C:/HashiCorp/Vagrant/embedded/gems/2.2.19/gems/vagrant-2.2.19/lib/vagrant/action/builder.rb:149:in `call'
3: from C:/HashiCorp/Vagrant/embedded/gems/2.2.19/gems/vagrant-2.2.19/lib/vagrant/action/warden.rb:48:in `call'
2: from C:/HashiCorp/Vagrant/embedded/gems/2.2.19/gems/vagrant-2.2.19/lib/vagrant/action/builtin/config_validate.rb:25:in `call'
1: from C:/HashiCorp/Vagrant/embedded/gems/2.2.19/gems/vagrant-2.2.19/lib/vagrant/action/warden.rb:48:in `call'
C:/Users/minhthanh/.vagrant.d/gems/2.7.4/gems/vagrant-aws-0.7.2/lib/vagrant-aws/action/connect_aws.rb:41:in `call': undefined method `except' for # (NoMethodError)
Please help me check this. Thank you very muchs
ReplyDeleteIt 's an amazing and awesome blog. Thanks for sharing
ReplyDeleteAWS Online Training Hyderabad
AWS Online Course
I really appreciate how you outlined the Windows-specific challenges for deploying Vagrant to AWS. I’ve struggled with synced folder issues on Windows before, so your tip to disable it initially is super practical. Do you have recommendations for making the transition to Rsync smoother later on?
ReplyDelete