Installing Kubernetes in CentOS 7 with no previous experience
Lately I have been working with Kubernetes during the
preparation of a new course. In the past, when I needed a Kubernetes cluster I
used one of the cloud providers. GCP is specially good for Kubernetes but my
trial account run out. Besides, this course requires me to do some things with
VMware, so I had to create my own environment a few times in the lab on top of
vSphere. During this time, I couldn’t find any other references that worked for
me 100% so I decided to write this article with the few tricks that I have
learnt
A word of caution, during this process you will be doing
things like lowering the security of your virtual machines so that the cluster
installs more easily. So please do use this procedure only for development
environments and at your own risk
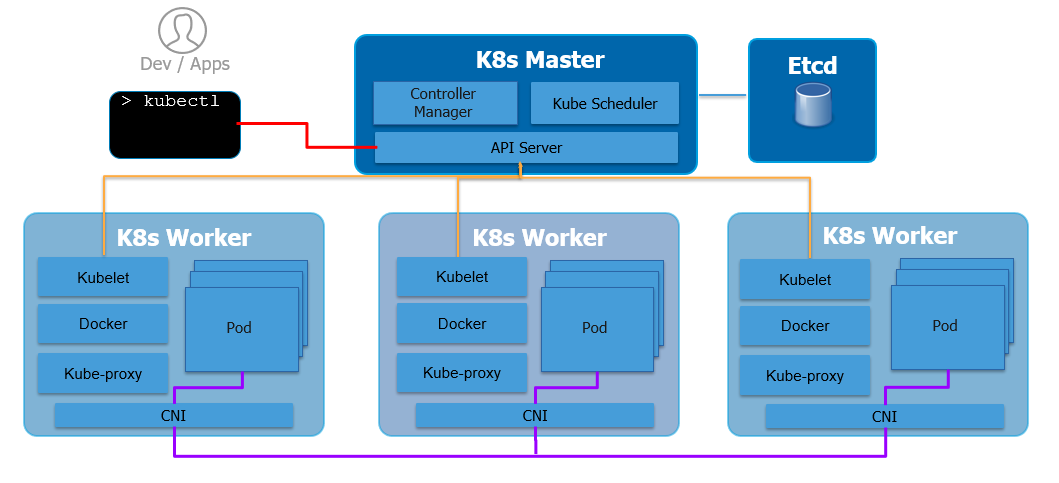
To understand what you are doing it helps to be a little bit
familiar with the Kubernetes architecture. You are going to need one Virtual
Machine for every not you want in your cluster. There are two types of nodes:
Masters and Slaves. Don’t worry about little boxes inside the Master and the
workers as those components (ex: API server, scheduler, etc) will run inside
the nodes as containers. The Etcd database is the only stateful component of
the whole architecture. For production environments it is a good practice to
run it separately by in a development environment we can install it as another
container/pod in the cluster. Also, for the purpose of development, a single
Master node is fine
The procedure consists of 3 steps:
- It starts by running the tasks that are common to both workers and slaves. This includes installing Docker, the kubelet and some security settings
- You will note that for simplicity we are going to install all 4 packages (kubelet, kubectl, kubeadm and the cni) in all nodes. You don’t really need to but they are not big packages and it gets easier to automate, ie you could have a single template VM that has all the common steps done before hand
- After the common steps you will create the cluster from a Master. When this task completes it provides:
- some instructions to configure the ‘kubectl’
- a command you will have to run shortly in your worker nodes
- Run the commands to configure “kubectl” on the Master
- Install the Flannel overlay network on the Master
- Run the “join” command on the Worker nodes only
In terms of the size of the VMs, I have been installing clusters with as little as 1 Master and 1 worker with 8GB RAM and 2 vCPU, and I can run a decent number of pods on it. Whatever you can add on top of that is fine. By looking at the resources they consume it would likely run just fine with 4GB RAM if you really need to.
The version of Linux I have tested this on is CentOS 7.6. More precisely centos-release-7-6.1810.2.el7.centos.x86_64
By copying all the bits from the article and pasting in the terminals you will likely complete the procedure in about 30 mins. Does that sound good? Let’s go
1 - Common tasks to all nodes
Let's configure repo before running YUMcat <<EOF > /etc/yum.repos.d/centos.repo [centos] name=CentOS-7 baseurl=http://ftp.heanet.ie/pub/centos/7/os/x86_64/ enabled=1 gpgcheck=1 gpgkey=http://ftp.heanet.ie/pub/centos/7/os/x86_64/RPM-GPG-KEY-CentOS-7 #additional packages that may be useful [extras] name=CentOS-$releasever - Extras baseurl=http://ftp.heanet.ie/pub/centos/7/extras/x86_64/ enabled=1 gpgcheck=0 EOF
This step is the lengthiest. If your template was already “updated” then you will save a big chunk of time
yum -y update
yum -y install docker
systemctl enable docker
systemctl start docker
Now that Docker is running, configure another repo for Kubernetes
cat <<EOF > /etc/yum.repos.d/kubernetes.repo
[kubernetes]
name=Kubernetes
baseurl=https://packages.cloud.google.com/yum/repos/kubernetes-el7-x86_64
enabled=1
gpgcheck=1
repo_gpgcheck=1
gpgkey=https://packages.cloud.google.com/yum/doc/yum-key.gpg https://packages.cloud.google.com/yum/doc/rpm-package-key.gpg
EOF
These security settings are not recommended for production environments but they make things easier
setenforce 0
Edit this config file and set SELINUX to permissive. You don’t want it to be "enforcing"
vi /etc/selinux/config
Install the Kubernetes packages. If you don’t specify a version for them, it will pull the latest. Three things to consider here:
- If you are planning to run something else on top of this cluster you will need to verify that is supported with the version of Kubernetes you install. At the time of writing most commercial distros of Kubernetes are on v1.13 and if I want my CSI drivers for XtremIO and ScaleIO to be supported I need to install this specific version
- The version of the CNI package changes with the version of the other packages. I found the one I needed (ie CNI v0.6.0) in the k8s v1.13 release notes. It would be nice if there was a table that shows the recommended version of CNI for every K8s release, but I couldn’t find one https://v1-13.docs.kubernetes.io/docs/setup/release/notes/
- The version of Flannel you will install later needs to match what the version of k8s. I found the hard way that the version of Flannel that works with k8s v1.13.1 is Flannel v0.10.0
yum install -y kubelet-1.13.1 kubectl-1.13.1 kubeadm-1.13.1 kubernetes-cni-0.6.0
systemctl start kubelet
systemctl enable kubelet
More networking and security settings
cat <<EOF >  /etc/sysctl.d/k8s.conf
net.bridge.bridge-nf-call-ip6tables = 1
net.bridge.bridge-nf-call-iptables = 1
EOF

sysctl --system
echo 1 > /proc/sys/net/ipv4/ip_forward

systemctl stop firewalld
systemctl disable firewalld
systemctl mask --now firewalld
This one is super important. You need to disable Swap. It breaks Flannel if you don't do it
swapoff -a
To persist the “swap” change through reboots you need to edit fstab. Comment the swap line
vi /etc/fstab
To check that swap is no longer in use do:
free -m
2- Create the cluster and install Flannel (Master node)
The next section applies only to the Master node. Now you are going to create the clusterkubeadm init --pod-network-cidr=10.244.0.0/16
When the previous command finishes it prints a message like this. Make a copy of the output (specially the “kubeadm join” command as you will need it later)
To start using your cluster, you need to run the following as a regular user: <-- need to do this

mkdir -p $HOME/.kube
sudo cp -i /etc/kubernetes/admin.conf $HOME/.kube/config
sudo chown $(id -u):$(id -g) $HOME/.kube/config

You should now deploy a pod network to the cluster.
Run "kubectl apply -f [podnetwork].yaml" with one of the options listed at:
  https://kubernetes.io/docs/concepts/cluster-administration/addons/

Then you can join any number of worker nodes by running the following on each as root:

kubeadm join 192.168.10.10:6443 --token z2ok1h.r4mp2tnb5bv4286n --discovery-token-ca-cert-hash sha256:3dde5bd32db6e8bb8c5edf369338381f22e07f2bfafa93f16dcae2db90b5331f
Run the first 3 commands from the previous output to create the ".kube" directory and to configure the kubectl command so that you can manage the cluster. You can run them as "root" user as well. No need to log out as regular user
Now you can verify that the cluster is running with the following command. It will show only the Master at this stage
kubectl get nodes
Before you can join any nodes to the cluster you need to install an overlay network. Kubernetes doesn't provide one. The most common choice is Flannel. A good alternative is NSX-T, but good luck installing that :D
As I mentioned above, the version of Flannel has to be chosen carefully depending on the version of Kubernetes. What I have found out is that version v1.13.1 of K8s works well with flannel v0.11.0
kubectl apply -f https://raw.githubusercontent.com/coreos/flannel/v0.11.0/Documentation/kube-flannel.yml
systemctl restart kubelet
Make sure that there are no pods crashing
kubectl get all --all-namespaces
3 - Join the worker nodes to your Kubernetes cluster
This final step needs to be run in the worker nodes. You will get them to join the cluster. On every worker you need to run the "kubeadm join" command that "kubeadm init" produced. It takes a minute or so to get ready status. Check the progress withkubectl get node

Thank you for sharing wonderful information with us to get some idea about it.
ReplyDeleteWorkday Course
Workday Online Training India
Excellent blog I visit this blog it's really awesome. The important thing is that in this blog content written clearly and understandable. The content of information is very informative.We are also providing the best services click on below links to visit our website.
ReplyDeleteOracle Fusion HCM Training
Workday Training
Okta Training
Palo Alto Training
Adobe Analytics Training
nice............!
ReplyDeleteworkday online training
power bi course